National Recycling Week: DIY projects to try at home


Now in its 17th year recycle week is a celebration of recycling, organised by WRAP under the Recycle Now brand.
This year's theme is 'Together - We Recycle', it is thanking the nation for continuing to recycle despite the challenges that COVID-19 has presented.
Advertisement
Hide AdAdvertisement
Hide AdOn its website it says: "We want Recycle Week 2020 to recognise the sacrifices that key workers and citizens have made to keep recycling going and create positive change in the world around us. Our recycling and waste key workers have heroically carried on collecting while the world slowed down around them."
To celebrate interior style advisor Rebecca Snowden shares her a eco-friendly DIYs that are easy, enjoyable and impactful.
DIY Kids Memo Board - Step by step guide
Turning to creative expression is a productive and calming experience that helps with stress relief for all ages. If you’re missing spending time with the family, a DIY kids memo board is a fun and simple activity to consider for family craft time.
“This memo board makes use of materials that are most likely already lying around at home like old bits of contact paper, scrap fabric or toys that are no longer played with but still loved.” said Rebecca.
Advertisement
Hide AdAdvertisement
Hide Ad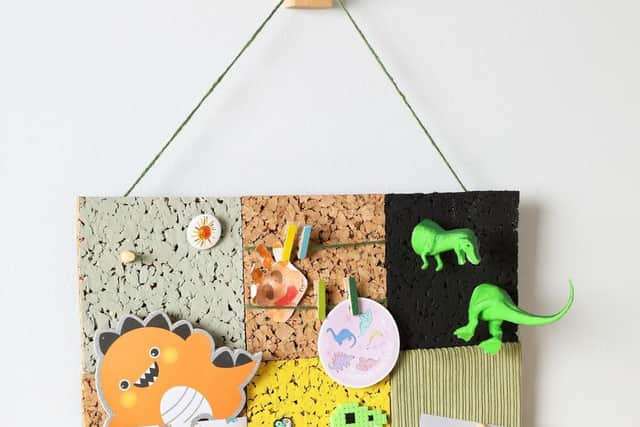
“Part of the fun is how customisable and collaborative it can be to really feel like a family project. For instance, each tile could be made by a family member and the entire board hung up in a communal area as a piece of functional artwork.”
What you will need
6 x cork boards (We purchased ours from The Range)
Scrap fabric
Paint
Paintbrush
Double-sided or gaffer tape
Magnetic Chalkboard paint (pick the colour of your choice)
Magnets
String
Scissors
Wrapping paper
Washi tape
Craft Pegs
Pencil & ruler
Cardboard
Step 1
For this memo board, each tile will have its own unique look. Start by spraying your first corkboard with magnetic chalkboard paint.
Step 2
Take your second and third boards and paint it in the colours of your choice. We chose sunshine yellow and sleek grey for ours.
Step 3
For your fourth board, wrap and tie two pieces of string around it.
Step 4
Advertisement
Hide AdAdvertisement
Hide AdMeasure a piece of wrapping paper to partly cover your fifth board. Then fold and secure it down with tape at the back of the board.
Step 5
For your sixth board, cover it in a fabric of your choice, then secure it with tape at the back. We picked corduroy for this one.
Step 6
Once all your boards are done, lay them all face down on their backs. Make sure each board fits snugly together before taping them in place.
Step 7
If you want to give your board more support, use a piece of cardboard to cover the entire back of the board then keep it in place with glue or double-sided tape.
Step 8
Advertisement
Hide AdAdvertisement
Hide AdCut a string the same length of your board and secure it at both ends with tape.
Step 9
Cover your craft pegs in washi tape to make it stand out.
Step 10
Now it’s time for you to hang the board on the wall! Use a hanging strip to keep it in place.
Step 11
Decorate your boards with whatever you fancy. We chose a dinosaur theme for ours.
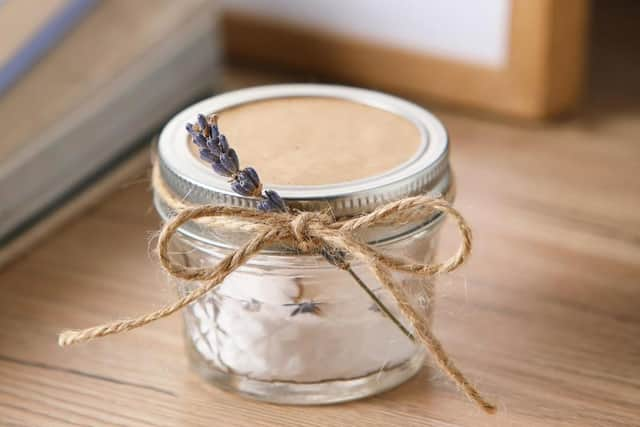
DIY natural air freshener
“Scent is a powerful facet to interior creation that can dramatically change how a space breathes and feels. Reach for your favourites to set an intention - whether it’s to create a productive, energising or calming ambience.” Rebecca said.
Advertisement
Hide AdAdvertisement
Hide Ad“Essential oils and dried fruit or flowers are great options for natural scents. Combining the health benefits of natural scents and detoxification ability of baking soda, this DIY is a 2-in-1 craft that’s practical and environmentally-friendly too” Rebecca adds.
You will need:
Baking soda
Natural scent of your choice (some ideas: lavender, eucalyptus, orange, lemon)
Essential oils of your choice
Glass jar or Mason jar
Bowl and spoon
Paper or fabric
Twine or string to decorate (optional)
Scissors
Needle or pin
Step 1
Pour some baking soda into the bowl - enough to fill your jar to a depth of about 1.5 inches. Then, add your scent of choice. In this case, we used lavender seeds and a few drops of lavender essential oil. Here are some scents to consider based on your needs:
Clarity and focus: peppermint, rosemary, patchouli
Energising: lemon, orange
Calming: lavender, vanilla, bergamot
Step 2
Mix thoroughly with a spoon and transfer the mixture into the jar.
Step 3
Advertisement
Hide AdAdvertisement
Hide AdIf you’re using a Mason jar, poke holes in the lid or replace the flat inner lid with a layer of paper - simply trace a circle around the jar lid onto the paper and cut it out. Poke holes in the paper using a pin, then stick or place the paper between the rim of the jar, then screw the outer lid on.
For regular glass jars with no lids, cut a circle out of fabric that’s 2-3 inches larger than the jar. Poke holes in the fabric using a pin. Then, secure over the jar mouth with string.
Step 4
We then went ahead and decorated ours by tying a sprig of lavender with some twine.
The mixture could also be put in a cloth pouch and left in drawers or cupboards to freshen them up. If you liked this idea, here are a few more ways to incorporate mindful living at home.
Comment Guidelines
National World encourages reader discussion on our stories. User feedback, insights and back-and-forth exchanges add a rich layer of context to reporting. Please review our Community Guidelines before commenting.